The AGA R3 Series 110cm 'Everyday' Cookers

A contemporary AGA - on all the time with a gentle background warmth


AGA Everyday eR3 110-4i in Slate

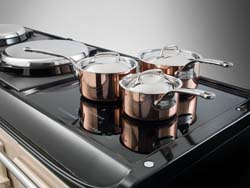
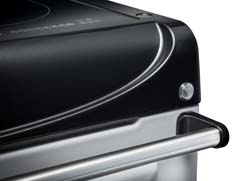
No flue needed, a gentle background warmth yet cheap to run, no annual servicing, with the additional flexibility o  a three-zone induction hob.


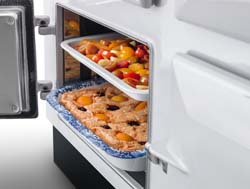
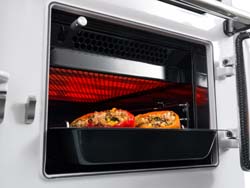
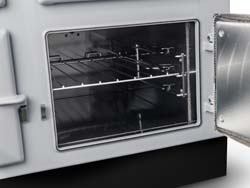
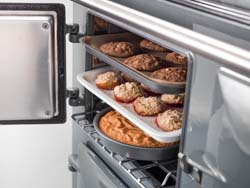
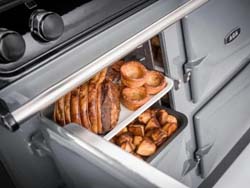
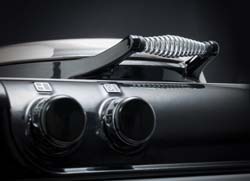
It's everything you'd expect of an AGA: welcoming background warmth; true AGA cast-iron roasting oven and hotplate for real AGA radiant-heat cooking; simple electrical connection (two 13amp connections - best with hard-wired, the cables are too big for plug/sockets); warming oven; a speedy, infra-red grill; low-energy 'economy mode'. All with simple, easy to use controls.


Hotplate

Left-side - a dual-function hotplate: Simmering or boiling


The outer section is useable and provides extra cooking area (albeit at a lower heat) to the main hot-plate.

Induction Hob

Right-side - Three-zone Induction Hob

AGA eR3 110-4i Three-zone Induction hob

Induction Hob - Functions

The R3 110-4i has a three-zone induction hob.


With touch-controls, pan detection and numerous automatic functions the induction hob adds a new level of functionality to your AGA.


Functions:

- Defrost / melt (44 C).

- Warm and keep warm (70 C).

- Warm and simmer (90 C).

- Boil-detection for water.

- Heat to frying temperature.

- Timer functions (various).

- Keep simmering or re-boil.

- Boil-detection for water.

- Boil dry detection.

- Pan detection.

Ovens

Upper left

Cast-iron roasting oven (in 'e' mode this is a baking oven).

AGA R3 doors open

Lower left

Twin-wall enamelled radiant baking oven (in 'e' mode this is a simmering oven)

AGA R3 Baking oven


Upper right

Infra-red grill


AGA R3 Infra-red grill

Lower right

Warming oven (switched separately). For plate and general 'warming' duties.

AGA R3 Warming Oven

Low-Energy 'e' Mode

This reduces energy consumption (and heat to the room).

When in 'e' mode the roasting oven reduces to baking temperature and the baking oven to simmering temperature. Both are still very useable and this setting is ideal for day-to-day cooking.


AGA R3 Doors open

Dimensions

Height to top-plate: 910mm

Top of rear upstand: 928mm

Width: 1100mm

Depth: 634mm

(front to back, measured to the front-plate, excluding the hand-rail, with hand-rail is 707mm)

Weight: 340kg


AGA 3 Series Dimensioned Line Drawing

Have more questions on installation requirements?

AGA Installation FAQs

Notes

The AGA R3 Series doesn't need a raised plinth.


A clearance of 650mm is required above the hob to any surface/extractor.


A clearance of 116mm is required to the left side to allow the oven doors to open far enough so the trays can be slid in and out without being obstructed by the door liner.


There is a 25mm spacer fitted to the back of the cooker which should not be removed.


This ensures the correct gap is maintained to any wall construction and allows the cooker to be fitted up to a plasterboard or 'combustible' wall.


There will always be a small (14mm) gap behind the cooker's top plate to the wall. (Due to the top-plate overhang of the back - see diagram.)


AGA 3 Series - clearances for oven door opening
AGA 3 Series - clearances to wall behind

Oven and Hot-plate Temperatures, Heat-up Times and Sizes.

Dual-Temperature Hot Plate (Left)

360mm diameter

Simmer Setting

20 minute heat-up from cold

200-240 degrees C


Boil Setting

40 minute heat-up from cold, 20 min from Simmer

300-340 degrees C


Hot Plate Surround

The area not covered by the lid surrounding the circular hot-plate has two durable sections, removable for cleaning and is designed to have pans resting on it to slow the cooking speed and reduce the heat.

Induction Hob
(Right)


- Heat to frying temperature.

- Timer functions (various).

- Keep simmering or re-boil.

- Boil-detection for water.

- Boil dry detection.

- Pan detection.

- Bridging function (join two zones to make one large one).


AGA 3 Series Three-Zone Induction hob option

Ovens

The AGA 3 Series ovens are the same size as any cast-iron heat-storage AGA so all the oven trays, shelves and roasting tins fit the runners.

Roasting Oven

(Baking in 'e' mode)

(Top Left)

Dimensions

W: 350mm
H: 250mm
D: 474mm
Useable Capacity: 41.48 litres

Approx. temperatures

(Measured at top)

240 C in 'Roast' mode
190 C in 'e' / 'Bake' mode

Heat-up time:

Approximately 2 hours 10 minutes.

To go down from Roasting to Baking when switching to 'e' mode - about 2 hours.

To heat up from Baking to Roasting when switching from 'e' mode - about 1 hour.

Baking Oven

(Simmering in 'e' mode)

(Bottom left)

Dimensions

W: 350mm
H: 250mm
D: 474mm
Useable Capacity: 41.48 litres

Approx. temperatures

190 C in 'Bake' mode
100-120 C in 'e' / 'Simmer' mode


Heat-up time:

Approximately 2 hours.

To go down from Baking to Simmering when switching to 'e' mode - about 1 hour 30 minutes.

To heat up from Simmering to Baking when switching from 'e' mode - about 1 hour.

Warming Oven

(Lower Right)

Dimensions

W: 350mm
H: 250mm
D: 474mm
Useable Capacity: 41.48 litres


Temperature

Plate-warming


Note

If you use this oven for keeping food warm then for food safety reasons it's not recommended to leave it for longer than two hours.

Grill

(Top Right)

Dimensions

W: 350mm
H: 250mm
D: 474mm
Useable Capacity: 29.5 litres

Colours

Available in all colours see colours page for more information.

The AGA R3 has black sidepanels (regardless of the colour you choose for the frontplate).

Electric Supply

Two "Switched, Fused, Spur Connection Points" are recommended

Why not sockets?

The cables are quite big and don't fit in a plug top.


You may have to ask your electrician to adapt an existing cooker switch / outlet (or the 'ring circuit') to fit the spur points - we don't recommend sockets; the cables don't fit in plug tops at all well and a spur connection provides a much safer solution.


Best Practice?

Fit two switched, fused, spur connection points. Both are fine to carry the full 2.8kW for at least as long as they would ever need to and should be fine. Belt and braces we know but better safe than sorry!


The spur points MUST be located to the side of the cooker, NOT behind it.

Ideally mounted in an easily accessible position on the back or side of a cupboard immediately adjacent to the cooker.


Spur Point Position Diagram

AGA R3 110 Electrical Supply - Spur point position diagram

(Click image for larger version)